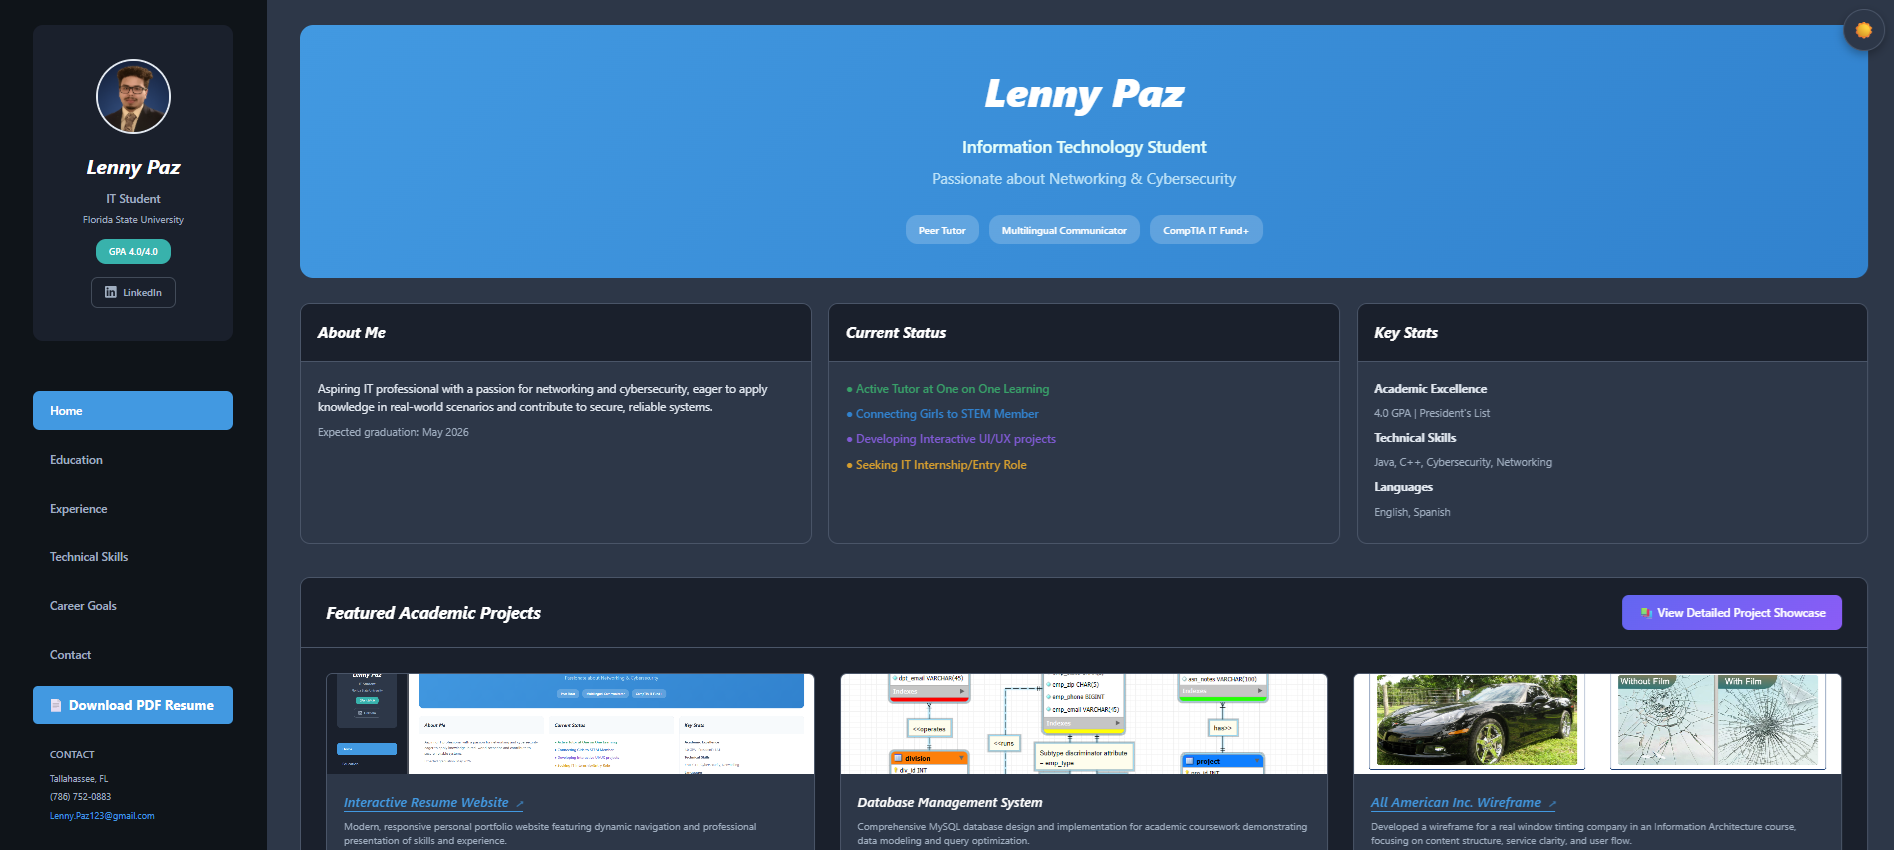
Interactive Resume Website
A comprehensive look at building a modern, responsive personal portfolio website from scratch, featuring real-time analytics, dynamic user interactions, and a full-stack architecture using Cloudflare Workers and D1 database.
Project Overview
I set out to create a resume that went beyond a static PDF, something more dynamic, interactive, and personalized. The goal was to design a responsive website that could showcase not only my experience and skills but also my growth in web development and backend integration. It's aimed at recruiters, instructors, and anyone curious about my work. This was a solo project with the scope of creating a virtual resume that could later be connected to our project portfolio.
I wanted to create something that would engage visitors and provide insights into how people interact with my content. This led me to implement features like real-time analytics, interactive project previews, and a contact system that notifies me instantly when someone reaches out.
The project represents a full-stack approach to web development, combining frontend design skills with backend data management and third-party integrations. Every feature was built with both user experience and technical learning in mind.
Technical Implementation
This project uses a lightweight tech stack: just HTML, CSS, and JavaScript on the frontend. The website is hosted on GitHub Pages, which provides free static hosting with excellent performance. However, for the backend functionality, I needed something more powerful.
For the backend, I used Cloudflare Workers paired with Cloudflare D1, a serverless SQL database powered by SQLite. To connect GitHub Pages with Cloudflare's services, I updated my domain's nameservers to point to Cloudflare.
Development Environment Setup
Setting this up was a big learning experience. Since D1 runs through Cloudflare's ecosystem, I needed to install several tools:
- Node.js – the JavaScript runtime environment
- npm – its package manager, used to install the needed tooling
- Wrangler – Cloudflare's command-line interface tool that helps deploy and manage projects
- SSH – to handle secure deployment to Cloudflare's infrastructure
After configuring the D1 database locally and defining the schema, I deployed everything via the command line using wrangler d1 and wrangler publish. This setup allowed me to handle form submissions, store analytics events, and track user sessions without relying on traditional hosting with a database server.
Key Features & Implementation
Some of the standout features that make this more than just a static website include:
- Mobile-first responsive design so it looks great on any screen size
- Theme toggle with a moon/sun button to switch between light and dark modes
- Real-time analytics showing how people interact with my resume
- Downloadable PDF resume for traditional applications
- Interactive project previews that appear when you hover over project cards
- Contact form integration via Telegram with secure backend processing
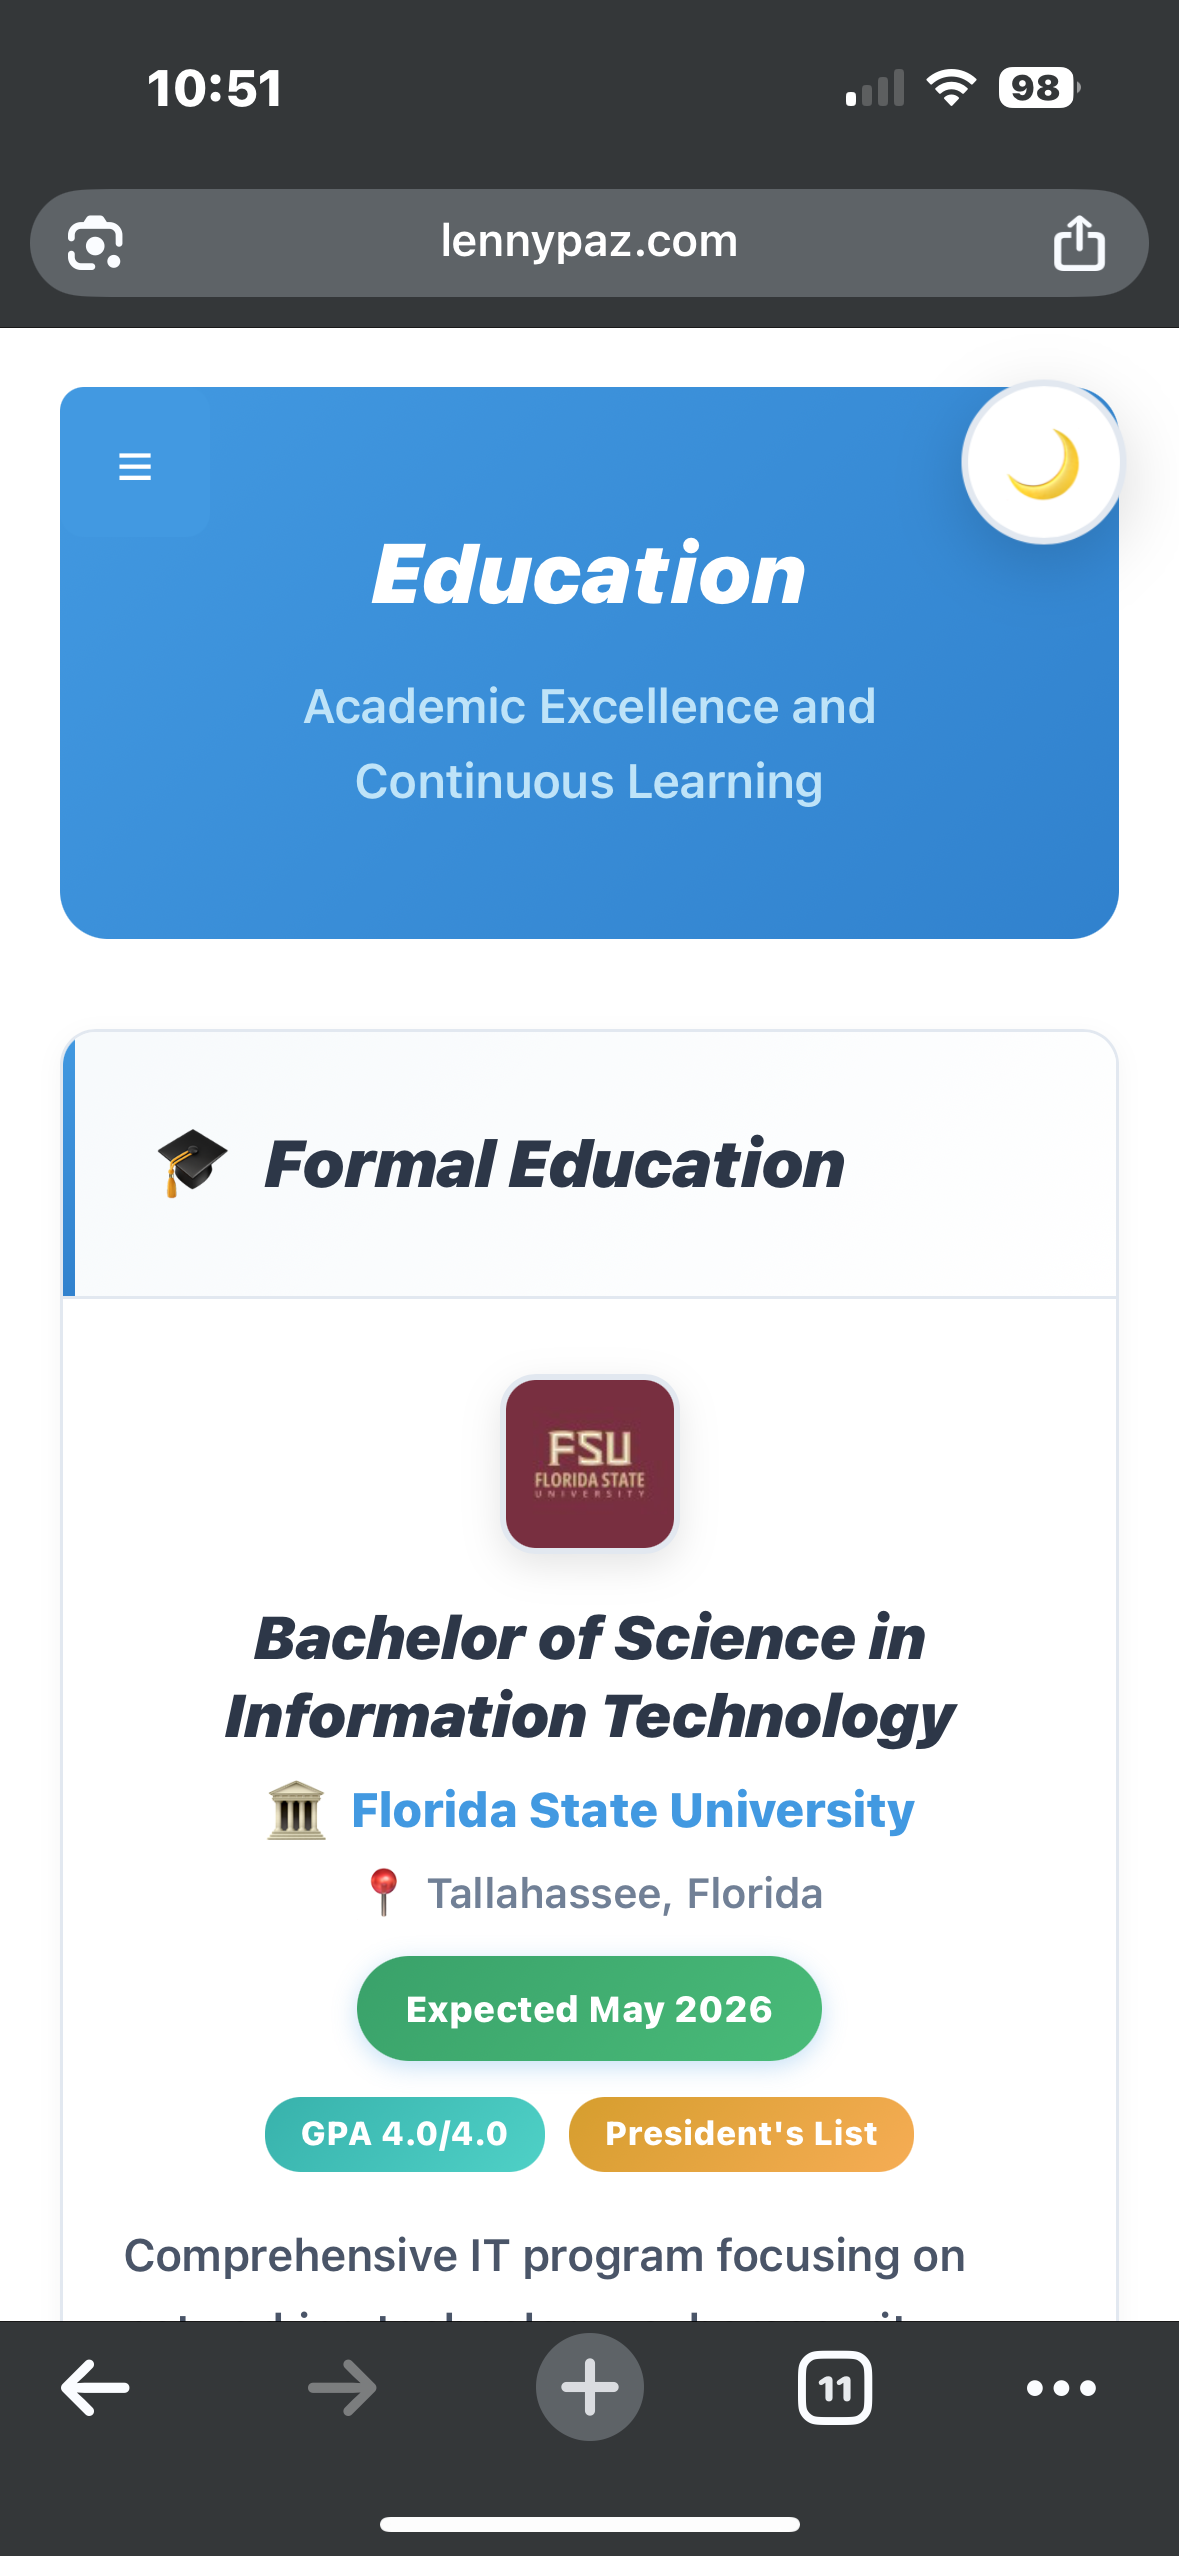
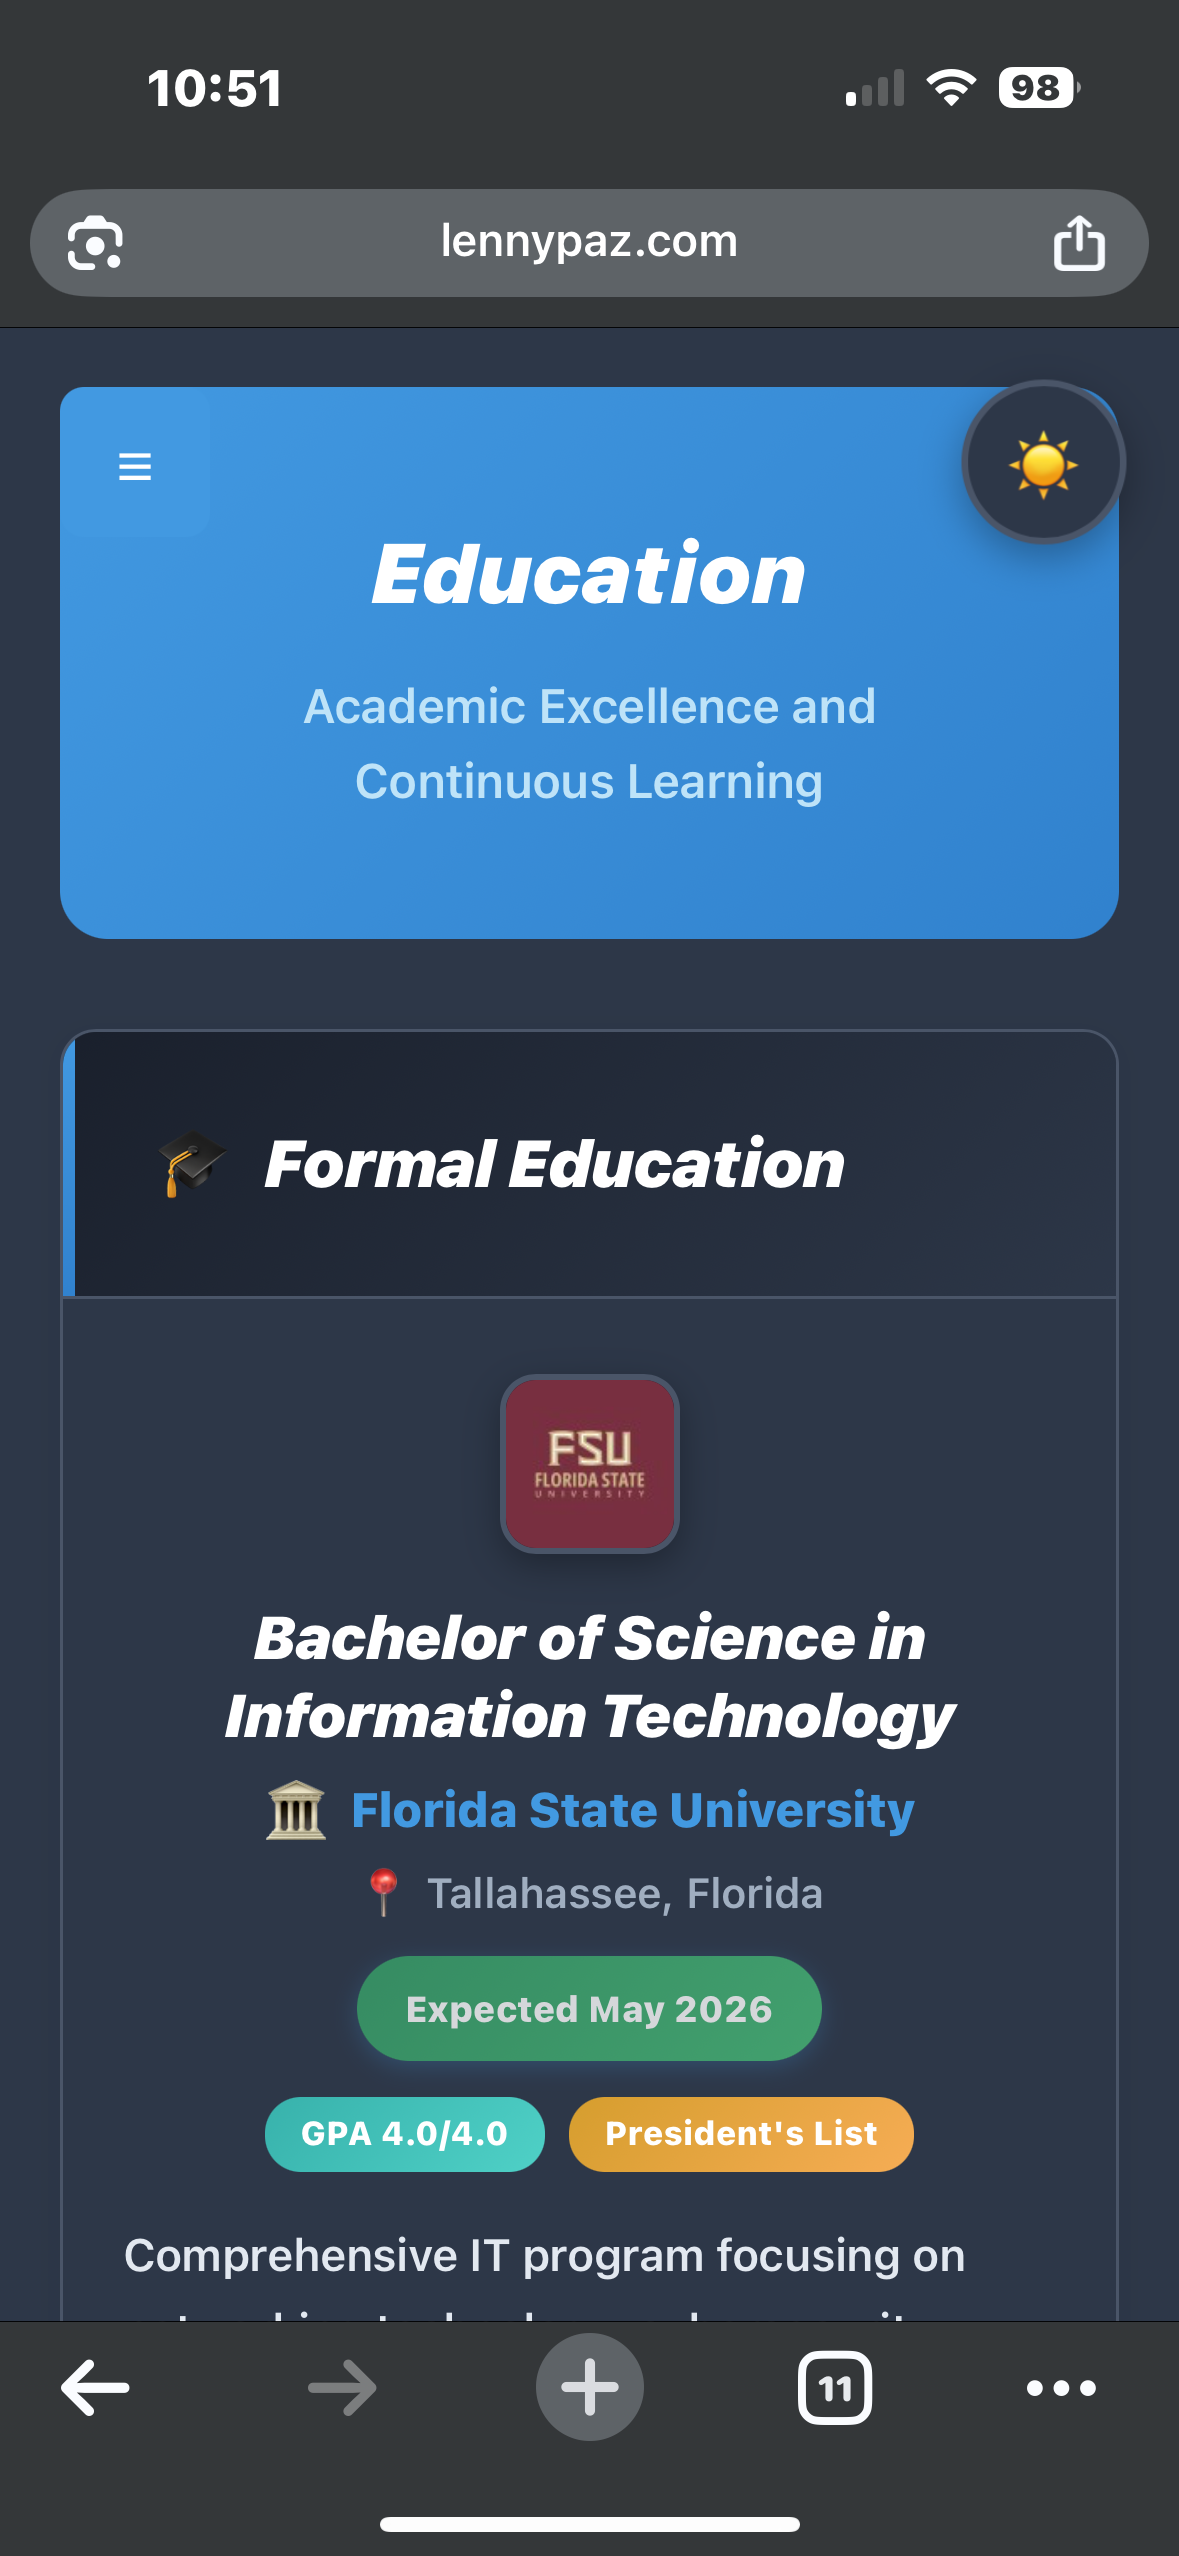
The Theme Toggle System
One feature I'm particularly proud of is the theme switching capability. It uses CSS custom properties (variables) to seamlessly transition between light and dark modes, and remembers your preference for future visits using browser storage.
function toggleTheme() {
const html = document.documentElement;
const currentTheme = html.getAttribute('data-theme');
const newTheme = currentTheme === 'dark' ? null : 'dark';
if (newTheme) {
html.setAttribute('data-theme', newTheme);
localStorage.setItem('theme', 'dark');
document.getElementById('theme-icon').textContent = '☀️';
} else {
html.removeAttribute('data-theme');
localStorage.setItem('theme', 'light');
document.getElementById('theme-icon').textContent = '🌙';
}
// Track the theme change for analytics
trackEvent('theme_toggle', {
theme: newTheme || 'light'
});
}
// Load saved theme on page initialization
function loadTheme() {
const savedTheme = localStorage.getItem('theme') || 'light';
const prefersDark = window.matchMedia('(prefers-color-scheme: dark)').matches;
const theme = savedTheme === 'auto' ? (prefersDark ? 'dark' : 'light') : savedTheme;
if (theme === 'dark') {
document.documentElement.setAttribute('data-theme', 'dark');
document.getElementById('theme-icon').textContent = '☀️';
} else {
document.getElementById('theme-icon').textContent = '🌙';
}
}
Challenges & Solutions
1. Working with Cloudflare D1 for the First Time
This was my first time deploying a live database using serverless SQL. Unlike traditional database setups where you might use phpMyAdmin or similar tools, everything with D1 is defined and pushed through Wrangler command-line tools. Here's a glimpse of the schema I created to track user sessions:
CREATE TABLE IF NOT EXISTS sessions (
session_id TEXT PRIMARY KEY,
total_time INTEGER,
active_pages INTEGER,
avg_time_per_page INTEGER,
total_events INTEGER,
is_active INTEGER,
user_agent TEXT,
referrer TEXT,
screen_resolution TEXT,
timestamp TEXT );
CREATE TABLE IF NOT EXISTS events (
id INTEGER PRIMARY KEY AUTOINCREMENT,
session_id TEXT,
event_name TEXT,
event_data TEXT,
timestamp TEXT );
Getting this to work involved debugging the deployment steps and making sure timestamps were recorded consistently. The serverless nature of D1 meant I had to think differently about database connections and query optimization.
2. Getting Comfortable with Adobe Dreamweaver
Although many developers today use code editors like VS Code, I decided to try Adobe Dreamweaver on my own to see how it could help with design visualization. It came with a learning curve—especially around how it handles asset paths and previews—but it helped me better understand front-end layout behaviors in a visual way.
The split view feature was particularly useful for seeing how CSS changes affected the layout in real-time, which helped me catch responsive design issues earlier in the development process.
3. Reliable User Activity Tracking
One of the more technical hurdles was capturing user sessions accurately. A lot can go wrong: users close tabs, leave pages open, or go idle. To handle this, I wrote logic that tracks when the page is hidden, when the user is idle for too long, or when they navigate away:
// Multiple approaches to catch user departure
document.addEventListener('visibilitychange', () => {
if (document.hidden) {
trackEvent('page_blur');
sendAnalytics(true); // Send immediately when page becomes hidden
} else {
trackEvent('page_focus');
}
});
// Reliable for navigation away from page
window.addEventListener('pagehide', () => {
sendAnalytics(true);
}, { passive: true });
// Handle idle users
let idleTimer;
const resetIdleTimer = () => {
clearTimeout(idleTimer);
idleTimer = setTimeout(() => {
sendAnalytics(); // Send after 2 minutes of inactivity
}, 120000);
};
// Reset timer on user activity
[
'mousedown',
'mousemove',
'keypress',
'scroll',
'touchstart'
].forEach(event => {
document.addEventListener(event, resetIdleTimer, { passive: true });
});
resetIdleTimer(); // Start the timer
This multi-layered approach helped improve session accuracy and allowed me to calculate meaningful metrics like average time per page and user engagement patterns.
Visual Showcase
Screenshots of the desktop and mobile views, dark/light mode toggles, and a peek at the analytics dashboard really help bring the work to life. One of my favorite details is how the navigation transitions are smooth and snappy, making the site feel more like an app than a static page.
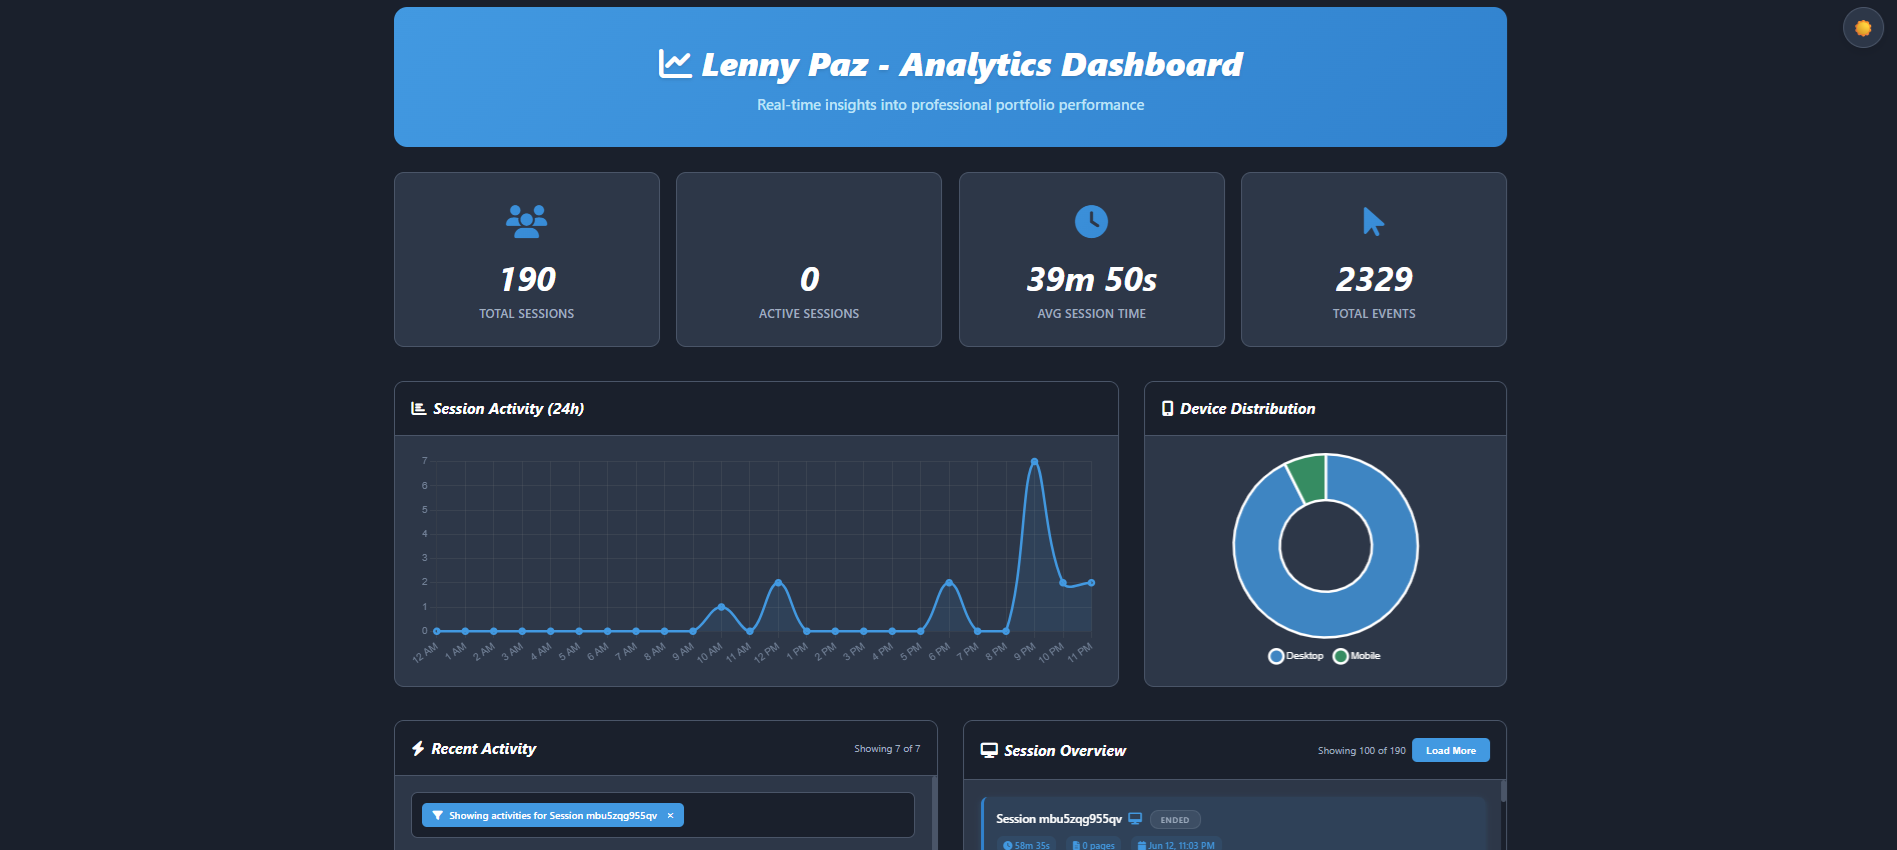
Performance & Analytics
I implemented a lightweight system to collect metrics like:
- How long visitors stay on each section
- Which pages they view and in what order
- Whether they download my resume or toggle themes
- What device and browser they're using
- Which projects they click on or interact with
All of this is viewable through a custom analytics dashboard I built myself. It even shows what device the user was on and tracks specific interactions like project clicks:
{
"event": "project_click",
"timestamp": 1702345678901,
"session_id": "abc123def456",
"data": {
"project": "Interactive Resume",
"section": "home",
"user_agent": "Chrome/Mobile",
"screen_resolution": "375x667"
}
}
The analytics dashboard provides insights that help me understand which content resonates most with visitors and how they navigate through the site. This data-driven approach helps me make informed decisions about future improvements.
Notable Code Implementations
Contact Form Integration with Telegram
One of the most practical features is the contact form that sends messages directly to my Telegram. I chose to route this through Cloudflare Workers for security reasons—since GitHub Pages repositories are public, anyone could view my source code and potentially access sensitive API tokens if they were stored in the frontend.
export default {
async fetch(request, env, ctx) {
// Handle CORS preflight requests
if (request.method === "OPTIONS") {
return new Response(null, { status: 204, headers: corsHeaders() });
}
// Only allow POST requests
if (request.method !== "POST") {
return new Response("Method not allowed", { status: 405, headers: corsHeaders() });
}
try {
const data = await request.json();
const { name, email, subject, message } = data;
// Format timestamp in Eastern Time
const easternFormatter = new Intl.DateTimeFormat("en-US", {
timeZone: "America/New_York",
weekday: "short", year: "numeric", month: "short",
day: "numeric", hour: "numeric", minute: "2-digit", hour12: true
});
const formattedTime = easternFormatter.format(new Date());
// Construct message for Telegram
const text = `🔔 New Contact Form Submission\n\n` +
`👤 Name: ${name}\n` +
`📧 Email: ${email}\n` +
`📋 Subject: ${subject}\n` +
`💬 Message: ${message}\n\n` +
`🕒 Time (ET): ${formattedTime}`;
const telegramUrl = `https://api.telegram.org/bot${env.TELEGRAM_BOT_TOKEN}/sendMessage`;
const res = await fetch(telegramUrl, {
method: "POST",
headers: { "Content-Type": "application/json" },
body: JSON.stringify({
chat_id: env.TELEGRAM_CHAT_ID,
text: text,
parse_mode: "Markdown"
})
});
return new Response(res.ok ? "Success" : "Failed", {
status: res.ok ? 200 : 500,
headers: corsHeaders()
});
} catch (error) {
return new Response("Server error", { status: 500, headers: corsHeaders() });
}
}
};
// Helper function for CORS headers
function corsHeaders() {
return {
"Access-Control-Allow-Origin": "*",
"Access-Control-Allow-Methods": "POST, OPTIONS",
"Access-Control-Allow-Headers": "Content-Type"
};
}
This lets me get real-time form alerts directly to my phone, while keeping all sensitive credentials secure and hidden from public view.
Lessons Learned
This project taught me valuable lessons that extend far beyond just writing code:
Technical Growth
I became more comfortable with backend concepts like RESTful APIs, SQL schemas, and data validation. Working with serverless architecture showed me how modern web applications can scale efficiently without managing traditional servers.
Learning to handle cross-origin requests, timezone formatting, and real-time data transmission gave me a deeper understanding of how web applications communicate across different systems and time zones.
User Experience Insights
The analytics data revealed surprising patterns about how people actually use the site. For example, I discovered that mobile users spend significantly more time reading the technical skills section, which influenced me to optimize that section's mobile layout.
I also learned the importance of user experience design, especially on mobile devices. Small details like touch target sizes, loading animations, and smooth transitions make a significant difference in how professional the site feels.
Development Workflow
Managing deployment and live debugging through command-line tools was initially challenging but ultimately taught me valuable DevOps skills. Understanding how to troubleshoot issues in a production environment, read server logs, and deploy updates safely are crucial skills for any web developer.
"Building this project taught me that great web development isn't just about writing code—it's about understanding users, measuring outcomes, and continuously improving based on real data."
Future Improvements
Here are some enhancements I plan to make:
Enhanced Security & Reliability
- Bot protection for the contact form—potentially using a honeypot field or CAPTCHA-like behavior to prevent spam
- Rate limiting on form submissions to prevent abuse
- Input sanitization improvements for better security
User Experience Enhancements
- Multilingual support (i18n) to make the site accessible to a wider audience
- Heatmap or scroll-depth analytics to see which sections people engage with most
- Progressive Web App features like offline functionality and installability
- Enhanced accessibility with better screen reader support and keyboard navigation
Development Process
- CI/CD automation so future updates are deployed with less manual effort
- Automated testing to catch issues before they reach production
- Performance monitoring to track loading times and user experience metrics
The modular architecture I've built makes these enhancements straightforward to implement without disrupting the existing functionality that's already working well.